
Having an automated cleaning buddy like a Shark robot vacuum saves you time.
It cleans the floors for you, so you don’t have to!
But it can sometimes run into some issues, especially the errors – which you’d probably get once in a while!
Among its other errors, Shark Robot vacuum error 2 and error 9 are the common ones.
This shark robot error #2 has a name – obstruction error 2.
And your Shark robot gives you the message of this error by flashing the Red LED lights.
So if your shark robot stops moving while cleaning, it’s caused by this error 2.
The good news is that you don’t have to deal with this issue forever.
With a handful of troubleshooting, you can easily fix this Shark robot Vacuum error 2.
In other words, I’d walk you through the solutions, so you can fix it just the way I did!
Why does this error 2 message appear?
Shark’s best feature is its self-cleaning brushroll, which is in most models.
“Please check underneath the robot for an obstruction error 2” with an exclamation point with red flashing. message, it’s time for some troubleshooting!
The reason why you get this message is that the brushroll can’t spin freely.
It’s common for smart vacuum robots to pick up debris on the floor while it’s cleaning.
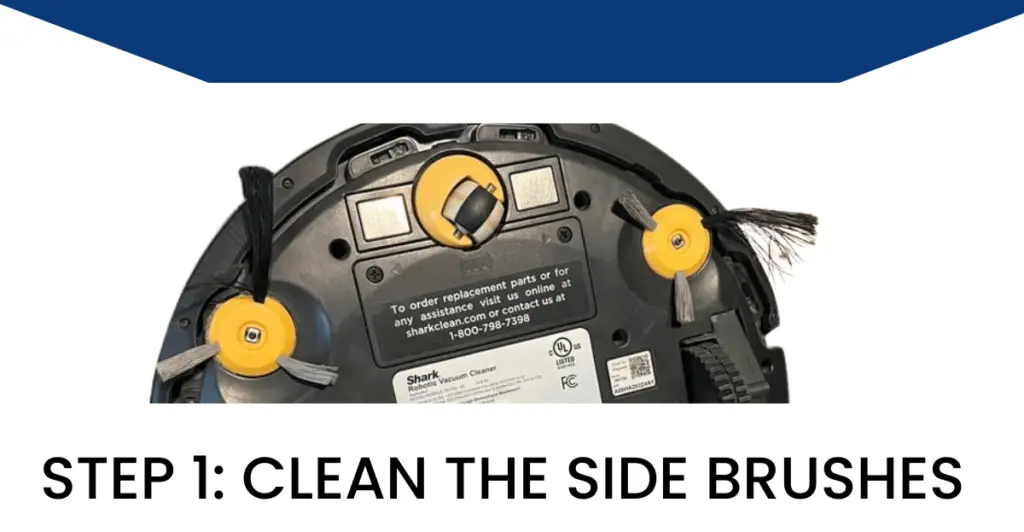
Step 1: Start by cleaning the side brushes
The first thing that you need to check is the brushroll of your Shark robot vacuum. If it isn’t moving around freely on the floor, chances are there’s something stuck around it.
It could be debris, hair (both human and pets), or just about anything.
To see if that’s the case, gently place the Shark Vac on a clean surface. So it doesn’t get any scratches before you flip it over to inspect its brushroll!
Here’s how you can safely clean the side brushes:
Step 1: Turn off the Shark robot vac
Step 2: Wear gloves (particularly, if it has a lot of debris around them)
Step 3: Turn it over (be sure to place it on a clean surface)
Step 4: Start cleaning them with a soft cloth
Step 5: Gently pull the side brushes off using their bristles
Step 6: Don’t forget to clean their bristles
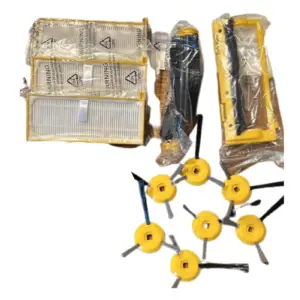
A Side Note: If the side brushes are damaged or worn over time, replace them!
Step 2: Clean the main brushroll
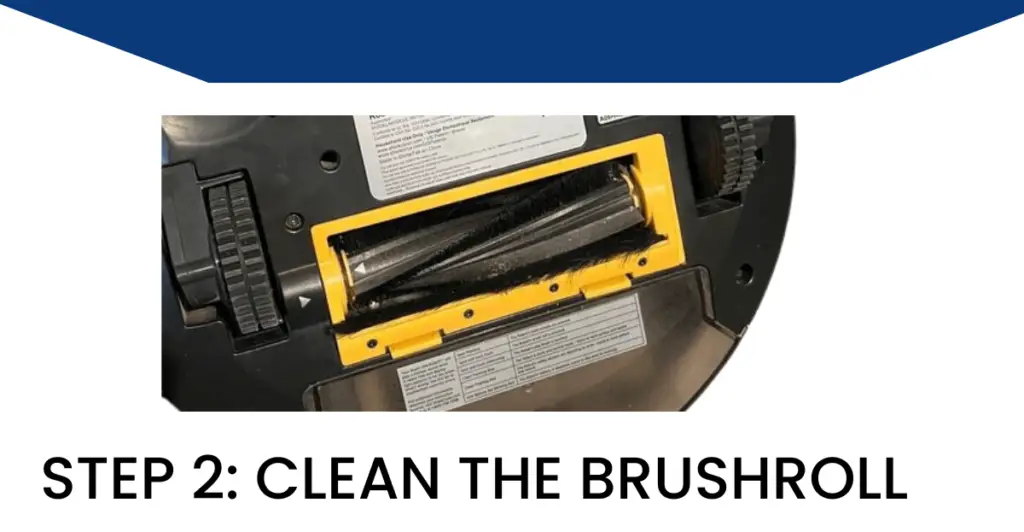
Besides side brushes, there’s a main brushroll (roller brush) that needs to be cleaned.
So the next thing that you should do after cleaning the side brushes is to clean the brushroll.
There are two tabs that you need to press simultaneously to remove the brushroll.
(In some models, you might need to unscrew to get the roller out.)
Here’s how you should clean the main brushroll after removing it step by step.
Step 1: Make sure the Shark robot is unplugged
Step 2: Now after you pull out the brushroll, remove the hair stuck around it
Step 3: Use the vacuum nozzle inside the brushroll compartment to clean the debris
Step 4: Apply a generous amount of grease on its plastic compartment
Step 5: Put the brushroll back in its place carefully
Now hit the clean button to see if it starts moving!
A useful tip: Use the tweezers to pull out the hair!
Step 3: Clean the Drive wheels
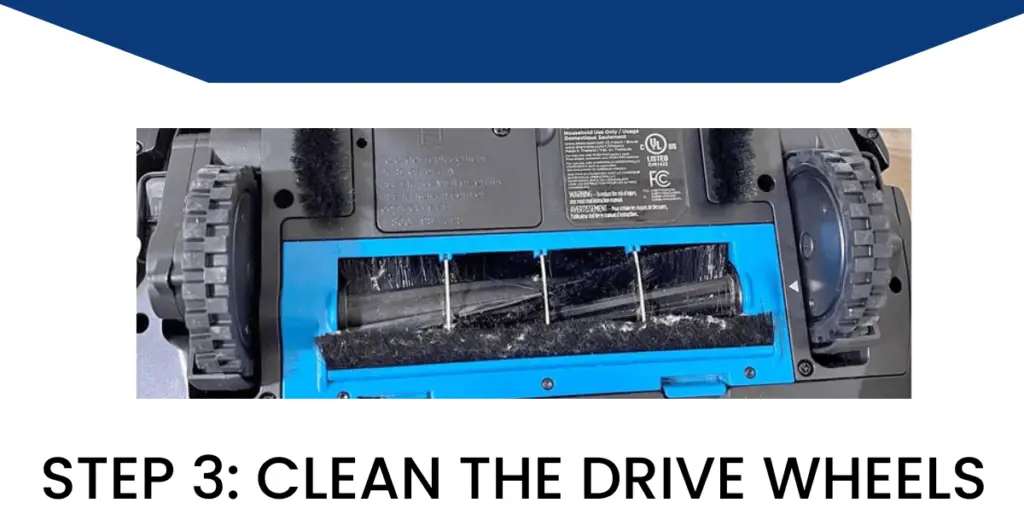
Though error 2 should go away when you reach step 2, you should still try cleaning other parts!
Your Shark robot vacuum has drive wheels that you can clean as well.
- Remove the battery
- Grab the screwdriver and unscrew the wheels
- Lift the drive wheels (Gently squeeze the connectors attached to the wheels)
- Start cleaning the drive wheels gently to pull out the hair wrapped around them
After removing the hair and dust buildup, restart the device.
Step 4: Power cycle the Shark robot vacuum
After cleaning and getting rid of the debris and cluster of hair, it’s time to restart/reboot your smart vacuum!
First things first, power cycle the Shark vacuum by turning it off.
Find the on/off button on the side of your Shark robot vacuum.
Keep it switched off for several seconds before you turn it back on.
This would refresh the software in case it’s causing error #2.
Error 2 should disappear by now because you’ve cleaned pretty much every part that’s obstructing the movement of the Shark robot vacuum. But if it persists, try the next two steps!
Additional Step: Reset the Shark robot
After all the cleaning, your Shark robot should spin and move freely.
But if it doesn’t, you should try to reset the unit.
Just remember that it would erase the map and you’d need to remap it again.
That said, here’s how you can reset your Shark robot vacuum.
Step 1: Find the reset button (at the bottom of the unit)
Step 2: Press and hold down the button for several seconds
Step 3: Release the button and it should reset the unit
Besides this, you can also reset the Shark robot through its app.
Note: The resetting procedure may vary from model to model
At this step, error 2 should go away. After all, you’ve done the cleaning and resetting the device. I recommend trying the bonus step in case there are some glitches or bugs in the system.
Bonus Step: Update the firmware
Typically, your device can get updated to the latest firmware automatically if there’s any new update. However, if the version of your firmware hasn’t been updated, try to contact Shark support. They’ll be able to initiate the firmware update for your model of the Shark robot vacuum.
Last Step: Replace the damaged parts
Sweeping ability is affected when your Shark robot vacuum shows you error #2.
Despite all the cleaning, rebooting, and resetting, the device can still display this error.
If that’s the case, the last option you’re left with – replace the sweeping and spinning parts.
In other words, get a good replacement for the Main brush and side brushes if they’re not spinning.
Wrapping Up
In short, when you get this error 2 message from your Shark robot vacuum, it’s time for a cleanup! If possible, take apart all the spinning and sweeping parts of your Shark unit. For example, take out the parts such as wheels, brushroll, and side brushes and clean them up. Pull out the clusters of hair wrapped around these spinning parts of the unit. And it should make error 2 disappear. However, if it doesn’t go away, consider contacting Shark Support. So you can get your smart vacuum buddy back in its shape!